RPi 4 NAS w/ Auto-Torrent (WIP)
Note: This guide is strictly for educational and experimental purposes and I am in no way condoning the use, nor advocacy, of software to acquire copyrighted media content. Please watch your favorite movies or TV via Netflix, Disney +, Amazon Prime Video, HBO, etc.
I've taken snippets of code and of other similar guides to compile this guide. All references are at the end.
This guide assumes basic knowledge of linux commands. If you are unsure, please refer to the man page of each command.
Step 0: Prerequisites
Upon completion, this server should be able to the following:
- Automatically download all your favorite TV shows and immediately after they air/become available
- Have all of your media neatly organized and named consistently
- Be able to network stream content to any device
Hardware Needed:
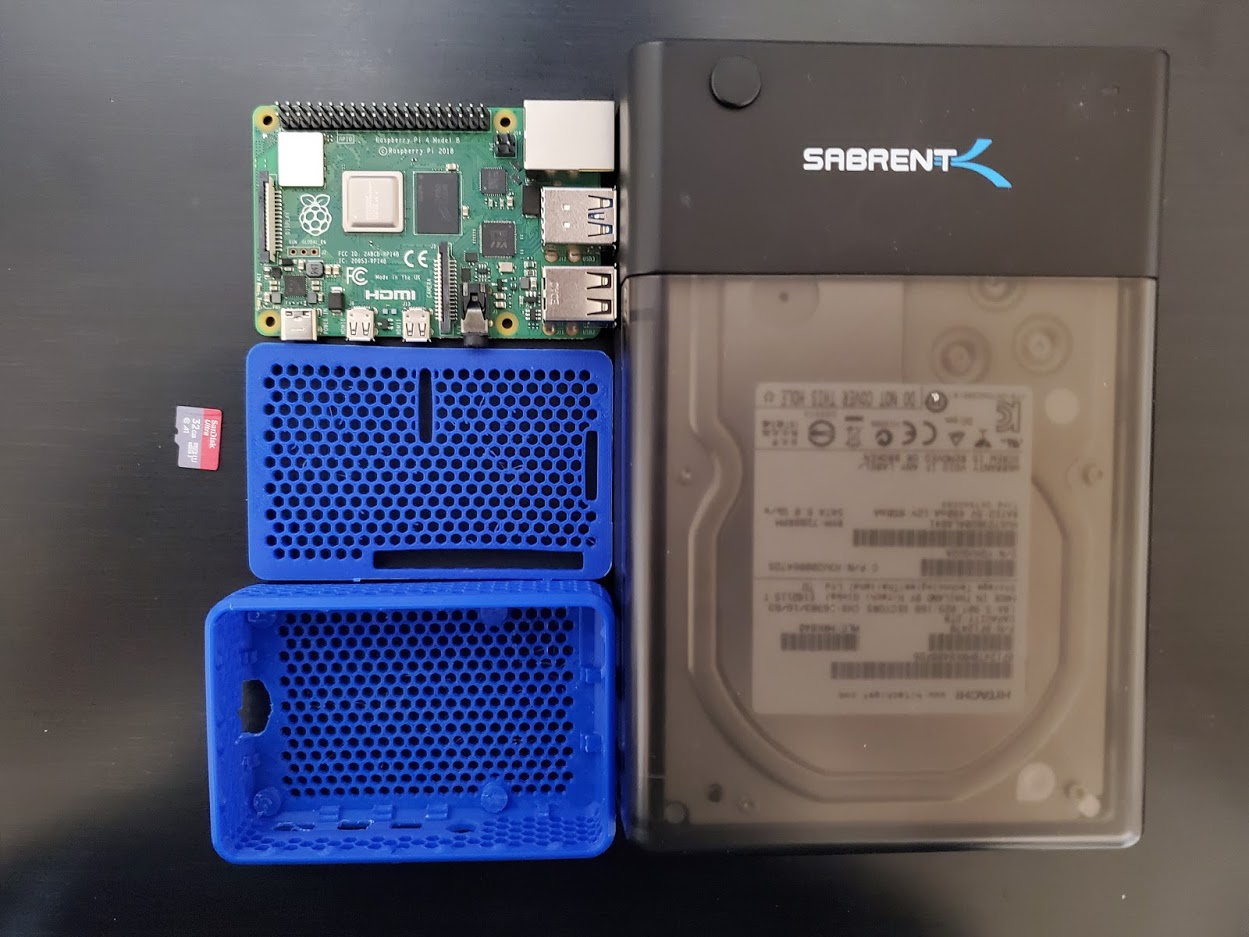
- Raspberry Pi 4 (2gb +)
- Micro SD Card (16 GB minimum; 32 GB recommended)
- Hard Drive or SSD (Ideally 2+ TB)
- USB 3 Enclosure for Hard Drive/SSD
- All necessary cables (power, data, network, etc.)
Software that will be used:
- OS: Raspberry Pi OS (32 bit) Lite
- VPN: Private Internet Access - OpenVPN w/ IPTables
- Torrent Client: Deluge
- Movie Fetcher: Radarr
- TV Fetcher: Sonarr
- Subtitles Fetcher: Bazarr
- Tracker Consolidation (Optional): Jackett
- Media Solution: SMB Sharing via Samba and/or Jellyfin (not covered)
1 Basic Setup
Download the OS file and use balenaetcher, or your tool of choice, to format the SD card into a bootable disk.
Insert the SD card into the Raspberry Pi, and start connecting the wiring, do NOT connect power yet.
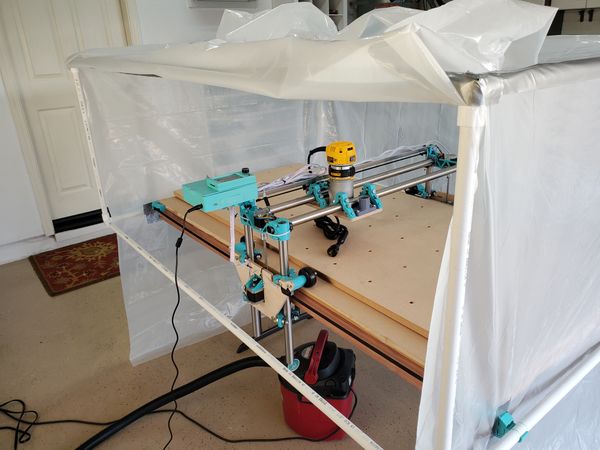
You should have the following devices connected to the Raspberry Pi: Display Output, Ethernet, Keyboard, Hard Drive Enclosure (with Formatted Hard Drive inside), and optionally a mouse.
Take note of the IP Address on LAN: 11.1.1.175
sudo apt update
sudo apt upgrade -y
sudo apt autoremove -y
sudo raspi-config
The following must be done in Raspi-Config:
- [1] [3] Password
- [1] [4] Hostname - I changed to Piplex
- [1] [5] Boot Status - I changed to Boot with Login
- [3] [2] SSH - MUST enable
- [5] [2] Time Zone - Optional
- [5] [3] For Logitech K120 - Generic 104 key - Other - US - English US - First Option for both
- [8] Run once before rebooting
Reboot the Raspberry Pi
sudo reboot now
1.1 Static IP
For setting up the Static IP I followed this guide. Here are the necessary steps:
Let’s first retrieve the currently defined router for your network by running the following command.
ip r | grep defaultBy using this command, you should get a result similar to the one we have below.
default via 192.168.0.1 dev eth0 proto dhcp src 192.168.0.159 metric 202
Make a note of the first IP mentioned in this string.
Next, let us also retrieve the current DNS server.
sudo nano /etc/resolv.confFrom this command, you should see the lines of text below.
# Generated by resolvconf
nameserver 192.168.0.1
Ctrl-X to exit
Make a note of the IP next to “nameserver“. This will define the name server in our next few steps.
Now that we have retrieved both our current “router” IP and the nameserver IP we can proceed to modify the “dhcpcd.conf” configuration file by running the command below.
This config file allows us to modify the way the Raspberry Pi handles the network.
sudo nano /etc/dhcpcd.confWithin this file, enter the following lines.
First, you have to decide if you want to set the static IP for your “eth0” (Ethernet) connector or you “wlan0” (WiFi) connection. Decide which one you want and replace “<NETWORK>” with it.
Make sure you replace “<STATICIP>” with the IP address that you want to assign to your Raspberry Pi. Make sure this is not an IP that could be easily attached to another device on your network.
Replace “<ROUTERIP>” with the IP address that you retrieved in step 1 of this tutorial
Finally, replace “<DNSIP>” with the IP of the domain name server you want to utilize.
This address is either the IP you got in step 2 of this tutorial or another one such as Googles “8.8.8.8” or CloudFlare’s “1.1.1.1“.
Append this to the bottom of the file in the following format
interface <NETWORK>
static ip_address=<STATICIP>/24
static routers=<ROUTERIP>
static domain_name_servers=<DNSIP>
My config was the following: (8.8.8.8 was for PIA)
interface eth0
static ip_address=11.1.100/24
static routers=11.1.1.1
static domain_name_servers=8.8.8.8 11.1.1.1
Prior to restarting, run either:
hostname -I
or
ifconfig
This will spit out the current IP address
sudo reboot now
After rebooting, check that this has changed.
1.2 Key Verification
Another tool that is useful to set up is Key Verification, this allows us to skip entering our password when we enter.
I ran these commands in Powershell from my C:\Users\Vedan\ folder to add the key to piplex.
ssh-keygen -t rsa -b 4096 -C "youremail@example.com"
ssh pi@piplex
mkdir .ssh
exit
cat id_rsa.pub | ssh pi@piplex 'cat - >> /home/pi/.ssh/authorized_keys'
1.3 External Drive Mount
Let's now mount the external hard drive to the Raspberry Pi. I have used this guide to set this up.
USB drives should be automatically mounted when it is connected to the Pi. If you want to check where your drive has been mounted, you can simply use the following command.
sudo cat /proc/mountsI wasn't able to find my hard drive, so I had to look for a troubleshooting step.
I added the following lines before exit 0 in /etc/rc.local
sleep 20
sudo mount -a
2 More Networking
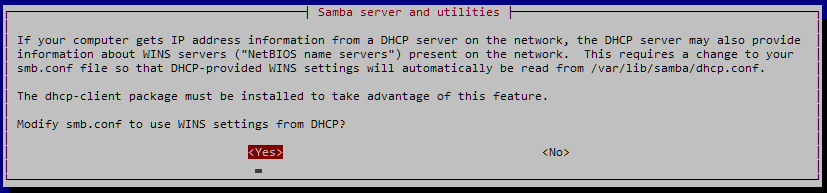
Next let's set up Samba Shares. This should allow us to access the filesystem of the Raspberry Pi from any device on the network. I used this guide to set up Samba.
We can install the packages that we require to setup Samba by running the following command.
sudo apt install samba samba-common-binThis will install approx. 20-50 packages and their dependencies.
References: